Thursday, February 25, 2010

Homemade Laundry Soap

The ingredients for savings!

Making your own laundry soap sounds like one of those hard-core cheap-o things to do that only the fanatics among us would attempt.  Once I started making my own, however, I found that it is amazingly easy, astoundingly cheap, and cleans my laundry better than store-bought detergents.

You will need:

One bar pink Zote soap.  This is a laundry soap formulated for easy grating and good cleaning and brightening.
1 1/2 cup baking soda
1 1/2 cup borax
(Note:  These amounts will make enough to fill an old one quart yogurt container, which is where I store my soap.)

Grate a third of a bar of Zote into a bowl (I have an old plastic bowl that was retired to the laundry for just this purpose, which is what you see below.  No artificial "stunt photography" here!)

Zote is a very soft soap that grates easily with a vegetable grater.  Keep the bar well wrapped so it doesn't dry out between uses, as the harder soap is more difficult to grate.

Add baking soda and borax, and mix.  Store.

You will use only about a tablespoon per load, so this stuff lasts forever.  Experiment until you find the right amount for your washer, but don't overdo.  Excess soap will lay in the soap tray if you overload it.

I started using this just on towels, then moved on to underwear, jeans, and finally all of my laundry.  (Full disclosure:  I "treat" my black laundry to a special dark fabrics detergent, even though I've never noticed my homemade soap causing any fading.)  Hubby notes that workout clothes washed in the homemade variety don't smell "sour" after wearing, like they do with commercial detergents.  Plus, I think the clothes look cleaner, and they definitely smell outdoor clean without having a perfume smell.

The Analysis

Fast:  It takes about 10-15 minutes to make a batch of laundry soap.  Not a big investment in time to save a lot of money!

Cheap:  I knew this was inexpensive, but I didn't realize how cheap until I did the math:
      Zote:  One bar is $0.99, so a third of a bar is $0.33.
      Baking Soda:  A 64 oz box is $1.99, so a cup and a half is $0.37.
      Borax:  A 76 oz box of 20 Mule Team Borax is $3.99, so a cup and a half is $0.63.
Total:  $1.33 for a full quart container of laundry soap. 

Good:  Cleaner, better smelling clothes, no detergents in the waste water stream, no big empty plastic bottles in the landfill (recycle those cardboard baking soda and borax boxes). 
Pin It!

Tuesday, February 23, 2010

Cheesy Potato Soup


My food photography skills fail me on this one, but this is the best shot I have of a cheap and hearty meal that has become a weekend staple around my house:  Cheesy Potato Soup.

Including a vegetarian meal at least once a week is a quick way to reduce your food bills while upping your consumption of veggies.  This soup is hearty, satisfying, and will have you warmed up in no time after a day of shoveling snow.  (My thanks to "sal" on Allrecipes.com, who wrote the recipe that served as the inspiration for this version.)

Cheesy Potato Soup
2 T butter (Pasture butter if you can find it.)
1 c diced onions (From the root cellar if you have thought ahead.)
2 1/2 c diced potatoes, unpeeled (From the root cellar; I like the yellow potatoes if you are making a purchase.)
3 c chicken broth (Organic free range is nice.)
1 c heavy cream (Organic, again)
2 c shredded cheddar cheese
1 T dill weed (Dried from the summer makes it free.)
1/8 t ground cayenne pepper (Ditto on dried from summer.)
A few grinds of salt and pepper

In a large saucepan, saute onions in the butter until they are translucent.  Stir in potatoes and broth and let cook until potatoes are softened.

When potatoes are softened to your liking, add cream, spices, and cheese.  Cook until cheese is melted.  If you are using dill you dried yourself, you will see it "bloom" open, adding a lovely green speckle against the pale yellow of the soup.

Makes 4 servings.  Maybe 3 if you have been shoveling.

The Analysis

Fast:  This takes at most 45 minutes to prep and cook.  Not as fast as a can of soup, but darn quick in the homemade soup world.

Cheap:  This recipe, like many others, is scalable by budget.  Using organic free range broth and organic cream will drive up the price a bit, but these are choices I make because I am not happy with how CAFO animals are treated, and the organic options are at least some better.  On the other hand, relying on home-dried spices and cellared root vegetables will keep the price low. 

Good:  Much heartier and healthier than the glop from a can.
Pin It!

Thursday, February 18, 2010

Philosophy 101: Recharacterizing Waste

Is it waste or abundance?

This morning, I enjoyed some strawberry flavoring in my coffee, a wonderfully summery treat in the middle of February.  My treat made me think about how much sustainability depends on recharacterizing waste.

Last summer, my husband and I made our annual journey to the pick-your-own strawberry farm, then spent the rest of the day (and night) freezing strawberries and making jam and preserves.  Preserves, by their nature, create a lot of liquid, so after I canned the whole fruit preserves, I was left with a pot of strawberry syrup.

My first instinct was to throw it away; it was the by-product of preserves, not the product I was aiming for, so it must be waste.  But then I thought better:  this stuff wasn't waste.  It was ice cream topping.  It was coffee flavoring.  It was a valuable product all its own.  I canned two or three pints, and I enjoyed some today, a delicious abundance in a time of year that can feel very sparse and limited.

We need to do the same thing with all of our processes to lead a sustainable life.  Rather than immediately consider something waste, we should ask ourselves what it becomes next.  Holey towels become dust rags; old clothes become quilt pieces; poultry bones and pieces become stock.  And yes, the leavings from canning can become flavorings, toppings, and other treats.  In the process, our lives become filled with abundance, because we have limited our waste. 

What "waste" can you find value in today?

The Analysis

Fast:  Changing your way of thinking may take time, but many forms of "waste" take less time to recharacterize than they do to dispose of.  I can go through the hassel of taking fireplace ashes to my weekly trash can, or I can use them to line my compost bucket, reducing any food scrap odor and providing important nitrogen to my compost pile.  The result is the best fertilizer on earth.

Cheap:  Turning waste into abundance is always a financial win.  It has the added benefit of reducing the amount of first-use "stuff" you have to buy, too.  I'm certainly not buying strawberry coffee flavoring this year.

Good:  A life with less waste and more abundance; quite good.
Pin It!

Tuesday, February 16, 2010

Sprouting Peppers and Hopes for Spring

Brrr

Right now, the view above is the only one I can see out my front door.  Luckily, I have a better view inside:

That's better!

The pepper seeds I planted around Groundhog Day started uncoiling their little white backs out of the soil after just 7 days; by Valentine's Day, I had a full tray of little seedlings, each with their bright green first pair of leaves unfolded to the light.  So, it is time to give them something to reach for.

Many seed-starting handbooks (and virtually all gardening catalogs) will start you salivating over "seedling condominiums," these sets of shelves with adjustable banks of grow lights suspended overhead.  They are lovely, and they will set you back somewhere around $200-$300.  If you are going into commercial seedling production, this may be a reasonable capital expenditure.  I, however, just want a nice cheap supply of peppers and salsa next summer and winter.

So, I took an old desk lamp, and I inserted a $3 grow bulb in it.  The bulb will provide the correct spectrum of light for the peppers to grow, and you are only out the cost of the bulb.  (Sorry, a traditional fluorescent or incandescent bulb won't do it, because it won't throw the correct parts of the light spectrum for the plants.)

The low-cost grow light.

The drawback of this approach is that you will need to shift the light during the day so each pot of seedlings gets direct light.  They like to have at least 14 hours of light, so it helps to have your seedlings in a high-traffic area (remember, mine are still in the kitchen) so you will nudge the light whenever you pass.  However, this system has worked very well for me for years. 

We won't need to do anything else to the peppers until we see a first set of "true" leaves, which should be in a couple of weeks.  Until then, just turn that light on in the morning and let them grow!

The Analysis

Fast:  You can pick up a grow bulb at any hardware store or greenhouse, or most grocers.  I know you have an old desk lamp sitting around, or some other lamp with a goose-type neck that will shine down on your peppers.

Cheap:  I haven't purchased a grow bulb since last year, but I usually purchase one a year at about $3.  As you will see, this ultimately becomes part of an array of lights and windows for seedling growth, so it works out to be a good deal, and much better than those seedling condos.

Good:  Peppers are still the goal here, and we're one step closer to salsa!

Note:  If you do not have an outdoor greenhouse or sunroom and are in zone 5 or north, you can still grow peppers with us here at FC&G.  Start your seeds now, and you will be about 2 weeks behind me, or just perfect for "adult" plants ready to set out on the first of June.

Pin It!

Thursday, February 11, 2010

Cutting Costs with Coupons -- Carefully

If one of your primary motivations for embracing sustainability is saving money (and good for you, if so), then you will have found numerous books and blogs advising you to clip coupons.  If you watch daytime television, you have no doubt flipped on a show featuring some consumer who has managed to get her weekly groceries for free thanks to some fortuitous combination of coupons, coupon doubling, store sales, and rebates. 

If you are like me, after you deal with your feelings of coupon inadequacy, you start wondering what this woman is feeding her family.  If I actually could pull off a stunt like this, something tells me I would have a cart full of Go-Gurt and Pop-Tarts, plus 117 packages of disposable razors.  You will notice that the best sales always come on items that are full of HFCS, are overly processed, or are headed for a landfill after use.

Processed food and consumer product companies know that the small sales promotion known as a coupon will bring in those of us trying to save money; they hope it will gain them a convert to their product.  But be aware, they don't really want to let you have something for nothing.

Last night, I made my way out during Snowmageddon for an appointment, and along the way I stopped at the grocery.  (Names omitted to protect the guilty.)  I had in my hands a recent sales promotion for a premium brand of coffee offering a "free pound of coffee, up to $4.00."  Naturally, this is something I wanted to take advantage of.

Well, the store didn't post the price per pound, and I wasn't as vigilant as I should have been.  (This is thanks in part to the 20 minutes I spent digging my car out of the snow drift I call a driveway, but I digress.)  The end result was that I wound up with a pound of coffee listed at $7 and change per pound, for which I had a $4 coupon.  Still a respectable discount, but nothing to write home about price-wise.

My lesson?  If you are going to play the coupon game, remember that the deck is stacked in favor of the house, and it takes a great deal of planning to truly score a coupon deal.  I can't grow coffee, and I will drink this, so it is a fairly cheap lesson.  Had I purchased a food I could grow or make for myself and had a similar situation occur, I would be extremely angry.

The Analysis

Fast:  Coupons require time to clip, organize, and coordinate with your grocery list and store sales.  Only clip coupons for items and specific brands you would buy anyway, at full price. 

Cheap:  Not necessarily.  It is not at all out of the question for there to be a temporary price hike, either by the manufacturer or the store, that offsets your coupon.  Again, a coupon is only a deal if you would have purchased the item anyway.  If the coupon is the deciding factor, put the item back.

Good:  Make it your goal to try to restrict the food portions of your grocery list to the elements of food, rather than processed food, and you will see that your food bill goes down and that there are very few coupons available for you anyway.  Coupons for flour, spices, meat, and veggies are few and far between.

Fast food at its best!
Pin It!

Tuesday, February 9, 2010

Ode to the Pastured Egg, or, Cookies Like Grandma Made

Behold, the pastured egg!

I have recently lucked into a regular supply of pastured eggs, thanks to the efforts of a colleague who regularly visits a local farm.  (Thank you to the Egg Man, if he is reading this!)  I have to say, this has made a tremendous and unexpected improvement in our diet.

Pastured eggs are eggs from hens that have been fed primarily by grazing a pasture -- that is, they eat mostly grass and insects.  Even though they often require some additional feed during the winter, this is still a huge improvement over CAFO (concentrated animal feed operation) eggs, which come from hens that are kept in cages and fed mostly corn and antibiotics. 

Pastured eggs contain higher levels of omega-3 fatty acids, which we are learning are essential to heart health and mood stabilization. You will also just instinctively feel these eggs are healthier for you when you see how strong the shell is, how viscous the whites, how orange the "yellows."  These are clearly eggs intended to nurture a chick to hatching, and they must be better for a human along the way.  As it turns out, humans may need to consume a certain amount of grass and bugs, and it is more pleasant to get them by way of a chicken or cow. 

(For a much more complete explanation of CAFO operations and the benefits of food from animals left to live as God intended, read Michael Pollan's The Omnivore's Dilemma.  Check here to buy on Amazon.com.)

Of course, a dozen pastured eggs for two people each week is a bit of a challenge, so I have been doing more baking and slipping an extra egg in whereever I can.  One of the best uses for these eggs is cookies, and I propose you make them a lot more like Grandma or Great-Grandma used to.

Take the traditional Toll House cookie recipe.  Most of us are accustomed to a product made with margarine, white flour, and CAFO eggs, and we get a light cookie that is pretty tasty and that we can eat 14 of in a sitting. 

But Grandma didn't have any of this.  For one thing, she didn't have margarine, so substitute butter.  If you do just this step, your cookies may be a bit oily; in this case, it is a lesson in tweaking the entire system, not simply one input.  So, move on to substitute pastured eggs, a cup of light whole wheat flour for one of the cups of bleached white flour, and turbinado sugar for the refined white sugar.  Bingo, you have a rich, satisfying cookie that has a depth of flavor you wouldn't expect from a simple chocolate chip cookie.  You will be consuming better fats, more complex sugars, and whole grains, and you will probably eat about two before you are satisfied. 

It is a wonderful way to celebrate my supply of pastured eggs.

The Analysis

Fast:  Getting a supply of pastured eggs may take some time.  You are pretty much at the mercy of a local farmer or a small enough grocery to buy local.  However, putting a pastured egg into a recipe certainly takes no extra time.

Cheap:  Yes and no.  I pay $3.50 a dozen for these eggs, which works out to about 29 cents an egg.  This is way more than the CAFO eggs in the store, which I can often get for 99 cents a dozen.  However, I think if I figured things out based on nutrient density or lack of antibiotic contamination or the like, the pastured eggs would win.

Good:  This is why you buy pastured eggs.  When you taste the difference they make in recipes, you won't see this as a place to economize.
Pin It!

Friday, February 5, 2010

More Projects from the Remnant Rack: Fleece Pillowcases

In the winter, I sew and do textile crafts for relaxation; in the summer, I garden.  So, it seems I am doing a lot of remant projects these days, as I wait to get back out in that garden.

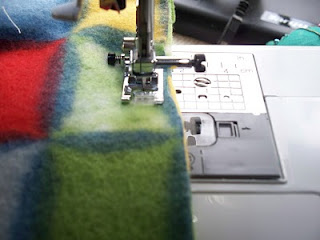
In a previous post, I talked about the wonders of the remant rack of your local fabric store.  Another easy project to undertake is the fleece pillowcase.  It requires only two seams and a hem, so it is very easy to complete if you have a sewing machine, and it is oh-so soft and cozy on a winter night.


For this project, I lucked into a beautiful piece of remnant fleece that was a yard and quarter long, but you really only need a scrap that is two-thirds of a yard in length.  Most fleece comes in 58 inch widths, so that is perfect for covering a standard pillow.

Step 1:  Cut your fabric.


Leave the 58 inch "width" intact and cut the "length" of the remnant.  I cut mine to about 21 inches; you may wish to cut yours a little longer if you have extra-puffy pillows, as this measurement will make the width of the pillowcase.  Don't go too far overboard, though, because too much fabric will make a baggy pillowcase.

Fold the fabric in half lengthwise, so the 58 inch side of the fabric (which is the width of the fleece on the bolt, but is the length of the pillowcase; this is confusing to read but will make more sense with a piece of fabric in your hand) is doubled.  Make sure right sides of the fabric are together.  You will see that the part that will become the bottom edge of the pillowcase is already made by the fold; you just have two side seams to do in order to make a bag, which is all a pillowcase really is.

Step 2:  Sew up side seams.


Sew each side seam with 3/8 inch seam allowance.  This isn't set in stone; it is just a sewing convention I was taught.  More or less seam allowance will make the pillowcase tighter or looser, so here is where you can make up for a mistake in cutting if needed.  Lock in your stitches at the top and bottom of the seam.

Step 3:  Sew the hem.

Fold the raw edges of the opening down an inch.  Make sure you are folding toward the wrong side of the fabric, which should still be the side of the fabric you see.  Since fleece doesn't fray, you don't have to fold in twice as you would with other fabrics.  Sew the hem with a zig-zag stitch. 

Step 4:  Turn the pillowcase right side out.
You are done!

The Analysis

Fast:  This project routinely takes me a half an hour; it may take you a bit longer if you are a novice sewer. 

Cheap:  Definitely.  Take advantage of that remnant bin.  I got a yard and a quarter of this fabric for $4.63, and I used about two-thirds of a yard.  That works out to $2.44 for fabric costs.  Throw a few cents on for thread, and you arrive at $2.50.  You cannot buy a standard pillowcase in any fabric for that amount.

Good:  My hubby raves about these in the winter months; they are so soft and warm.  I think they are one of those little touches that make it that much easier to turn down the heat at night and cozy up, listening to the sweet sound of the heat not running and money not being spent.
Pin It!

Tuesday, February 2, 2010

Groundhog Day: Time to Plant Peppers


Whether or not your local groundhog saw his shadow this morning, we know spring is coming:  it is time to plant our pepper seeds!

As I mentioned in a previous post, I start my seeds on Groundhog Day because I'm in the lower part of zone 5 and I have a greenhouse that protects fragile plants during the sometimes up-and-down months of April and May.  If that last sentence is all Greek to you, don't worry:  If you reside somewhere that the traditional advice is to plant flowers outdoors on Mother's Day, start your peppers now.  If tender plants go out later, delay a bit.  If they go out earlier, then get moving!

I have made two changes to my seed-starting routine this year:


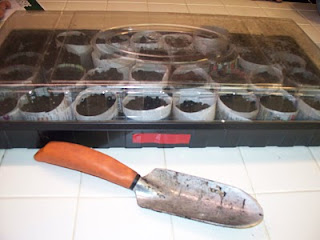
  1. I used to use the expandable peat pellets that fit neatly into the little plastic "greenhouse" tray.  However, while the pellets are very convenient, I don't believe the claim that the fine mesh netting over the peat pellet is biodegradable; I've pulled those nets intact out of the ground at the end of a growing season, still clinging onto tomato roots.  Instead, I am using the Burpee PotMaker http://www.burpee.com/product/seed+starting/potmaker-+1+potmaker.do, a cute little device that allows you to make seed starter pots from newspaper, which is certainly compostable.  A little pricy, but I probably buy $10 worth of peat pellets each year, so this will pay for itself in two years.
  2. Consequently, I am now using potting soil to start the seeds.  I'm convinced the little darlings will enjoy the nutrients in the potting soil more than they do the peat and will be healthier as a result.  We will see.


Ultimately, I made my pots, filled them with potting soil, and put in a few pepper seeds.  A few peppers will grow together as if they are a single plant, so five seeds in a pot isn't silly.  We won't be doing this when we get to tomatoes and zucchini.  Cover the seeds with a quarter to a half inch of soil, and cover the seeds with something that will hold in moisture.  I am using a plastic "greenhouse," but others have a lot of success with boxes covered with plastic wrap.


Now for one of my secret techniques:  While most garden supply stores will sell you heat mats to sit your seedlings on (and not a bad concept, because peppers, especially, like warm feet while they grow), I do the cheap version and sit mine on the counter over the dishwasher.  The heat from the dishwasher makes the peppers warm enough to grow.

For those worried about grow lights and things of that nature, you won't really need to provide any artificial light until the seedlings sprout, so we will cover that in about two weeks, when those little green hairpins that are pepper plants start uncoiling out of the soil.

The Analysis

Fast:  Hubby and I made the pots and planted the peppers in about an hour.  We won't need to do much other than check the dampness of the soil for quite some time.

Cheap:  The PotMaker set me back a bit this year ($19.95), but I think it will be a reasonable investment to reduce environmental impact.  I promise myself every year that this fall I will bring in a container of humus from the compost pile to use for seed starting so I don't wind up paying $2.99 for 20 lbs. of dirt (who pays for dirt, for crying out loud?), and this year I renew that pledge.  Someone yell at me in November to go out there and sift out some humus, OK?

Good:  Things growing in February; very good indeed.
Pin It!