Seven years. For seven years, I've been writing this blog, hoping to inspire some of you to live lives that are more respectful of your own time, money, health, and other resources. The efforts have spawned one book (and perhaps another in the future) and countless comments and discussions that I treasure.
However, I think the time has come to go on indefinite hiatus. There are only so many times I can tell you about starting my seeds or harvesting my tomatoes or making homemade bread. I do these things, but I'm not sure I have much else to tell you I haven't said before. This blog should provide value for all of us, and I think my well has run temporarily dry.
So, I'm going on indefinite hiatus.
I'm going to keep the blog open for reference and conversation, and I will likely post from time to time. However, it won't be a regular thing until my life takes a turn that gives me new ideas and new projects to share with you. Hopefully, one day in the not-too-distant future, it will be a move into a more temperate climate and a lot of new gardening and housekeeping issues to share.
Until then, please feel free to let me know if you'd like me to address a specific issue or project, and I'll come back to this blog to try to share my experience.
I bid you a sustainable - and happy - new year!
Friday, December 29, 2017
Friday, December 8, 2017
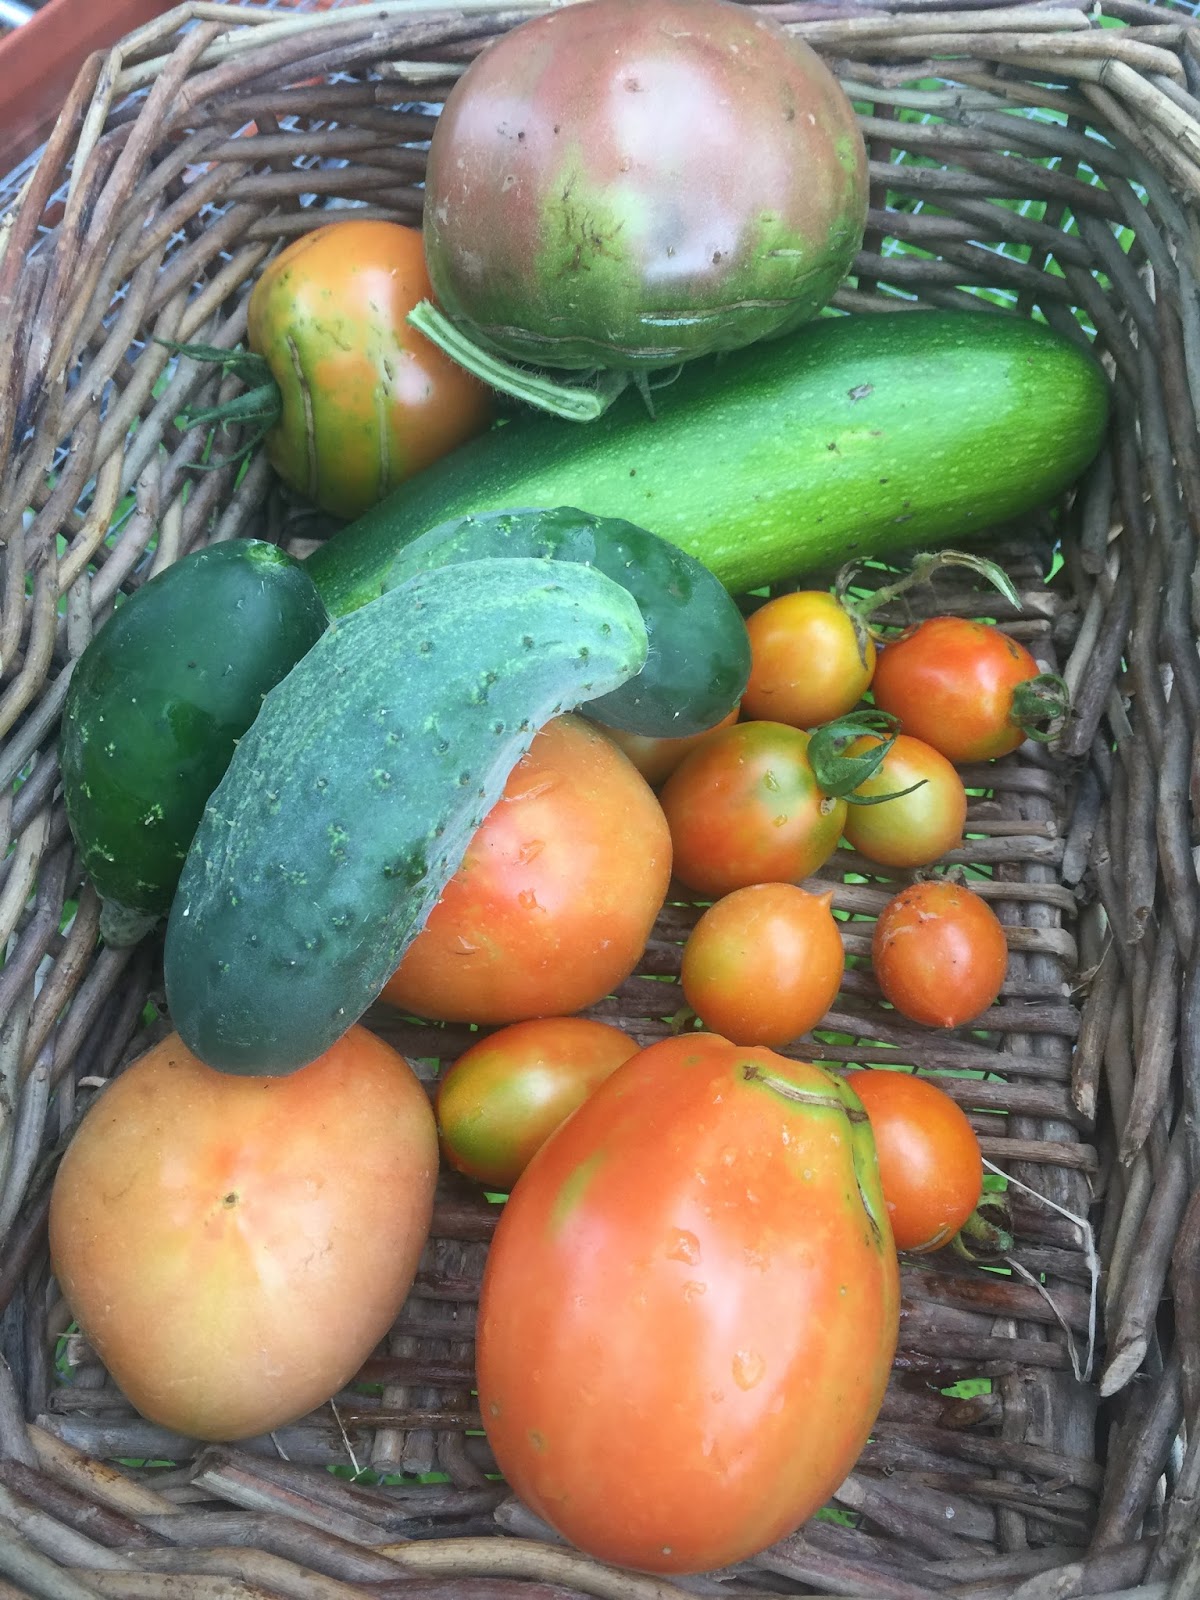
How Much Does a Garden Grow: October and November 2017

Speaking of sunroom, we adopted a puppy! This adorable little nugget unfortunately likes to climb into the pepper plants, but I think I've managed to create a way to discourage him from doing so. Nonetheless, I suppose it is time for me to line up a series of posts on sustainable dog ownership!
Regardless, October was our final month for tomatoes, and the big winner this year was the San Marzano crop, with over 38 pounds of harvest. Second was the Cuore di Bue (34 pounds) and the Principe Borghese (33 pounds). Obviously, these three types will repeat in the 2018 garden, with a new variety of Cuore di Bue that came from a friend (thank you, S!); hopefully, this will give me some even heavier tomatoes with better potential for sauce and juice.
Potatoes were a disappointment this year, but hope springs eternal. I have potatoes planted in the sunroom, and these sorts of plantings often lie dormant until spring and then turn into the most wonderful early spring crops.
At the end of December, I'll give you the final tallies and the overall report.
Cumulative Totals
Total Ounces of Harvest: 4290.0
Total Pounds of Harvest: 268.125
Total Retail Value of Harvest: $973.59
Total Expenditures: (-287.67)
Total Profit (Loss): $685.92

Friday, November 24, 2017
Butternut Squash Pie

The problem, of course, is how to use it. Butternut squash works in a variety of recipes; I use it in soup and in pasta for a little bit of extra nutrition. However, I'm always looking for a great new recipe.
I just discovered and adapted this recipe for butternut squash pie, just in time for Thanksgiving. It has the flavor profile of a pumpkin pie, but it is just a bit milder in squash flavor. Additionally, the homemade version bakes up with more of a custard texture, meaning that it is sweet and creamy enough to make you want to forego any whipped topping. And, most important, the recipe is easy enough to make on a regular basis!
Butternut Squash Pie
1 single pie crust (you can omit this and just bake the custard, if you prefer)
1 1/4 cup turbinado sugar
4 1/2 tsp cornstarch
1 T ground cinnamon (to taste)
1/2 to 1 tsp ground cloves (to taste)
1/2 tsp freshly ground nutmeg (to taste)
3 cups pureed cooked butternut squash
1/2 cup organic butter
2 large (free range) eggs
3 tsp vanilla extract
Heat oven to 350. Cut the squashes lengthwise, scoop out seeds, and place face down in a pan with about an inch of water. Bake until super-soft, about 45 minutes. Scoop flesh from squash and puree with an immersion blender. Cream together with butter and vanilla. (This is easier if you put the butter in while the squash is slightly warm.)
Mix dry ingredients and use blender to mix them with squash mix. Add the eggs and mix until smooth. (Be sure your puree is close to room temperature before you add the eggs.)
Pour into crust. Bake for 15 minutes with edges covered with foil, then bake 50-60 minutes longer or until a knife inserted in the center comes out clean. (You'll see that little divot that's visible in the pie above.)
Cool pie. Refrigerate leftovers, if there are any!
The Analysis
Fast: Slower than canned pumpkin pie filling, but worth the effort.
Cheap: Well, the squash were free. I can't say that this is a tremendous savings over canned pumpkin, but every little bit helps.
Good: Fresh, local ingredients make for a truly special and nutritious pie! (All that vitamin A from the squash!)
Tuesday, November 14, 2017
The Real Reason to Avoid Keurig

However, the entire discussion got me to thinking, and I do believe we should avoid Keurig and coffee makers like it. But the reason has nothing to do with politics and everything to do with the environment and with how we treat our time.
Single cup coffee makers are a sustainability disaster. Requiring those little cups every time you make a serving of coffee, they are yet another way we've found of turning a simple, inexpensive beverage into an expensive ecological misstep.
Yes, I know that one can buy refillable "K cups," but waste is not the only problem with the single cup coffee makers. Not only do they create a waste problem that needs to be solved with a more sustainable retrofit, but they speed a process that's already very fast, creating a false economy of time saving that I find not worth it. Is it nice to get a fresh cup of coffee in about three minutes? Of course. However, I can have an entire percolator full of fresh coffee in the time that it takes me to get ready for work, meaning there's enough there for a large thermos or a couple of cups in my office.
The idea that we need to save time at every possible juncture is problematic. Lately, I've been thinking a lot about how hard we push ourselves to rush through things, and we are missing out on experiences that we might enjoy if they were savored. That marginal-quality cup of coffee delivered to you in three minutes is nothing compared to the aroma of coffee percolating on the stove and the taste of coffee made a more traditional way. It's a simple thing, but it is important.
This is not to say that I've never seen a place where a Keurig is a benefit. For one thing, hotel rooms that offer in-room coffee trade the ease of use and self-contained nature of the machine for the pitfalls of trying to put other kinds of coffee makers out for their guests. There, it might make sense.
However, at home? I'm asking you to turn away from the Keurig, get some really high quality coffee beans and a percolator or French press, and treat yourself to a good cup of coffee to start your day. No Keurig advertising or lack thereof will change my mind.
Tuesday, October 31, 2017
Tickets to Paradise: A History of Key West Travel and its Advertising, 1912-1975

For the past three and a half years, I've been working on the book you see at your right. If you receive FC&G via email, the launch date of this book is today.
I fell in love with Key West on our honeymoon. As so many do, I got off our cruise ship and walked with my new husband down Duval Street, but it wasn't the bars and the shopping that first drew my eye; I thought that was a little overwhelming. Instead, my new husband decided we should cross over to one of the historic streets paralleling Duval, and it was then that the love affair began. I looked at all the old Conch and Victorian houses and felt that I could hear the echoes of the history of this island.
Meanwhile, through my college teaching, I was developing a specialty in the history of advertising, and I began to explore the advertising that brought people to the island. Along the way, I discovered that Key West has not always been a tourist town. Instead, it once was a thriving business hub, and the advertising reflected that. It was only with the onset of the Great Depression that things changed, and tourism became the island's primary industry.
As I wrote this book, I imagined who might read it. Of course, I want historians, advertisers, graphic designers, and those in the travel/tourism industry to read this. However, I also hope that tourists contemplating or in the middle of a visit to Key West grab a copy and learn more about their vacation destination.
If you are interested in this book, the Amazon/Kindle link is below. There is also a link to buy directly from me; for a limited time, the book is 20% off list price with free shipping to celebrate the launch.
Buy Amazon paperback or Kindle/e-book
Buy direct from the author
Tuesday, October 17, 2017
How Much Does a Garden Grow: September 2017

And just like that, high gardening season is over. September gave us the typical small harvest every other day. But, as I write this in mid-October, I am still harvesting a few tomatoes, some peppers, and arugula.
The big story this month is butternut squash. I've saved and replanted seed every year, allowing me to get a plant that is well-suited to being prolific in our climate. I harvested over 23 pounds this year from a very short row, for a retail value of $71.82. With so much squash on hand, I need to start making some pies; the butternut squash will taste just like pumpkin once I spice it. I might also pressure can some, since I have learned this year that it can be canned in cubes.
The San Marzano tomatoes kept coming in, for a yearly total thus far of 594 ounces or just over 37 pounds. For those of you keeping track (because I clearly am!), the tomato total through September was just over 178 pounds. Still not enough; never enough. But, I am grateful; I even had tomatoes in my stir fry last night, in the middle of October.
So, we are starting to wrap up a highly successful garden year! But, more to come, because October is still productive. Let's see if we can get to $1000 in retail price for the garden produce!
Cumulative Totals
Total Ounces of Harvest: 4253.5
Total Pounds of Harvest: 265.8438
Total Retail Value: $962.70
(Total Expenditures: $-287.67)
Total Profit: $675.03
Sunday, October 1, 2017
Interlude: On A Day Working in the Fall Garden.

I do not like your wretched fall.
I do not like the fall at all!
I do not like the falling leaves.
I do not like to wear long sleeves.
You may have your herbal tea.
Keep your soup far from me.
I do not want a cozy fire.
Sun and heat I desire.
I do not want to drive in snow.
I won't wear boots wherever I go.
I do not want to stay inside
Of this house where I reside.
I do not want to wear a sweater.
Shorts and flip flops would be better.
I want to garden all year round,
And live in a small beach town.
So keep your fall, if you please.
I'll winter in the Florida Keys!
Monday, September 25, 2017
How Much Does a Garden Grow: August 2017

In any event, I am pleased to say that the August garden helped push our garden tallies to a much more reasonable retail value total. Some highlights:
Tomatoes! I planted 71 tomato plants this year, and next year I hope to plant more. All the room, all the tomatoes. Cumulative totals through August:
Coure di Bue: 511 oz., $127.75
Principe Borghese: 493.5 oz., $123.38
Siletz: 364 oz., $91.00
San Marzano: 574 oz., $143.50
Black Krim: 167 oz., $41.75
Martian: 428 oz. $107
Volunteers: 226 oz., $56.50
So, through the end of August, I harvested 155.65 pounds of tomatoes for a retail value of $690.88. September will add to these totals. Nowhere near the goodness of 2009, when I think I harvested at least 300 pounds, but certainly better than we've had in years.
I was able to can 9 quarts of juice, 2 12-oz. jars of tomato soup, 7.5 pints of chili sauce, and 6 pints of tomato sauce, in addition to over a quart of dried tomatoes. Again, not nearly enough to get us through, but hopefully enough to give us some cushion.
Another good haul for the month was beans, and I harvested 118 oz. in August for a value of $22.42. We ate some of those fresh and I canned a lot for Mr. FC&G's winter lunches. I also plan to be selling bean seeds this year, since I have developed a strain that is very hearty and prolific.
Cucumbers did not do fabulously in their new spot this year, and I admit I lost track of the zucchini a bit, so I didn't can nearly as much as I should have.
All in all, a much better year. And I haven't even told you about September yet, or for my plans for harvests into the winter!
Cumulative Totals:
Total Ounces of Harvest: 3717.5
Total Pounds of Harvest: 232.3438
Total Retail Value of Harvest: $855.40
Total Expenditures: (-$287.67)
Total Profit: $567.73
Tuesday, September 12, 2017
Lessons Watching Irma from Afar

I've watched everyone pass wisdom around the internet, some of it useless and some of it downright destructive, and it reminds me that we all need a well-thought-out disaster plan well in advance of anything that may hit us. To that end, I thought I'd share a few tips that I have recently read that I thought were particularly helpful. If you have others or can contribute your own experience, please comment!
Additions to Your Disaster Plan
- Plan your "bug out outfit" or "disaster outfit" in advance. Try to come up with something that will handle various temperatures and situations. You may want a pair of quick-dry pants (nylon fishing pants work well in lots of climates) with cargo pockets; for cold weather, you can always add a silk base layer. Consider layering a tank top and an active-wear sweater if you are in a cooler area. Don't forget socks and hiking boots or something that will protect your toes from injury or infection. Break your shoe in ahead of time. Don't forget a hat for both temperature and sun protection.
- Sleep in your evacuation clothes. For disasters that come upon us suddenly, like rising water, you won't have time to get dressed, and no one wants to be on the news wearing undies and a t-shirt, to say nothing of sitting on their own roof that way waiting to be rescued.
- Likewise, pack a bag ahead of time. Make sure you have all of your medications, a knife, a whistle, and some ID in there, in addition to a full water bottle and some portable food, like granola bars. Take a couple of extra pairs of socks and some quick-drying undies, if you have them. Don't forget a flashlight, because you will be saving your phone for communication.
- Along the same lines, keep all of your electronics (like phone, tablet, etc.) fully charged for as long as you maintain power, and have a few external chargers as a backup.
- Even if you don't like social media, get a Facebook account. You don't have to do anything with it, but if you are in a disaster like Irma, you can post your whereabouts and tag family outside the disaster zone to let them know your status and potentially how to send help. Don't forget to set your posts to "public" so they are more easily visible. For all of its security-related downfalls, Facebook seems to have consistently been the one social medium that updates regularly and that is used by all ages, making it a good communication tool in emergency when appropriate.
- Freeze large freezer-type bags of water to stock your chest and fridge freezers. They will help keep the contents cold, and you will have drinkable water as they melt.
- Fill every receptacle with water while you can. Your bathtub and washing machine will hold water for washing and flushing your toilet. Every large pot and jar should hold drinkable water. Remember, you don't have to buy water to have a good supply of it as long as you plan ahead.
What is your favorite disaster tip? Did you learn anything from Irma?
Monday, August 28, 2017
The End is Near

The problem, of course, is that garden plants rarely die all at once, unless there is a hard freeze. So, I have plants that look like they've been put through the wringer, but they have a few viable green tomatoes or some cucumber blossoms or the possibility of a zucchini. I pulled a few this weekend, but I'm not going to pull anything that looks like it might still produce.
One of the amazing plants this year has been the Principe Borghese tomato, which you see in the bowls in the photo taken earlier this summer. Billed as a drying tomato, it indeed has given me many tomatoes to dry, plus many to eat raw. I've also dumped bowl after bowl of them into sauces and juices, because they are so flavorful. They were the first to be harvested at the end of June, and it looks like they may be my last whenever the vines finally give up.
The amazing thing about these tomatoes is that I understand that they were supposed to be determinate, meaning that they were supposed to set and ripen fruit within a small window to facilitate easier processing. Instead, they've been steadily producing for two months, and I expect them to go even longer. I can't wait to add up the August garden tallies and see how many pounds I've harvested.
I'm not complaining. As long as these sweet little things are willing to ripen for me, I'll continue to eat them. Every little bit counts.
Monday, August 21, 2017
Sustainability or Not?

In a way, I was sympathetic to his point. His idea was that simply being able to live and maintain the land at the same standard (a base level definition of "sustaining") wasn't good enough; that he sought improvement to his land and his production.
But, as you know, part of the subtitle of this blog references sustainability, and I still like the message.
Sustainability asks you if you could keep your lifestyle up - sustain it - through years and generations. Could you continue to eat through good harvest years and bad? Do you have enough money socked away to get your family through a job loss or a downturn in health? Do you have the skills to make do if there's a power outage or a decline in resources (or an increase in price)? Can you keep your soil as healthy and productive as it needs to be to maintain your garden?
To me, sustainability is a huge task. Improvements are often eaten up by bad years and bad spells and bad luck. Keeping an even keel is a tough job. But it is important to resist practices -whether that be using unhealthy herbicides, overspending, or damaging your health - that tips the balance so you cannot sustain a healthy, vibrant way of living.
I still like "sustainable." I think I'll keep it.
Monday, August 7, 2017
How Much Does a Garden Grow: July 2017

I'm feeling pretty pleased with myself, if I might say. The return to mechanical rototilling plus an early start with the seeds and some favorable weather has really worked to our advantage.
First up, let's talk tomatoes. We have harvested over 72 pounds of tomatoes in July alone, over $263 worth at current prices. My reviews thus far of the tomatoes:
- Principe Borghese has turned out to be a wonderful and prolific grape-sized tomato for drying. I've gotten so many, I've started throwing handfuls of them into sauces and stir frys.
- Siletz was a great early tomato, but it is incredibly fragile. Therefore, it is easy for one to look fantastic in the windowsill in the morning and be developing a bad spot that afternoon. That's frustrating, and I probably won't grow them again.
- Black Krim, of course, are my big fussy babies with the green shoulders and the tendency to be eaten by critters. But they are so worth it for the taste!
- Cuore di Bue is a wonderful sauce tomato, big and solid and beefy.
- San Marzano, likewise, is the quintessential sauce tomato. Both of these make great sauce and wonderful, thick juice.
- Martian is a storage tomato, and it has turned out to be a wonderful slicer with few seeds and a long life. Definitely worth the wait.
- Volunteers, of course, are always a surprise. I have some sort of prolific grape tomato that is not a Principe Borghese or a Red or Yellow Pear, and I have a round slicer of some sort. I also have those infernal yellow tomatoes. Why, oh why, did I ever grow them years ago? I don't even like yellow tomatoes (not acidy enough for my taste), and so I keep throwing them into the sauce, and then the seeds go into the compost, and then I grow them accidentally the next year, ad infinitum.
I'm hoping this is just the start of a prolific season. We could certainly use the tomatoes to can and put away for winter, plus feeding us both 6-8 slicers a day.
Cumulative Totals:
Total Ounces Harvested: 1638.0
Total Pounds Harvested: 102.375
Total Value of Harvest: $374.87
Expenses: (-$287.67)
Total Profit: $87.20
Monday, July 31, 2017
The Annual Canning Melt-Down
Somehow, between July and October, I need to develop and deliver three conference presentations (one down, two to go), design a new course, and do the rest of my regularly scheduled work, including a side biz. I also need to keep up with the garden, since heaven knows I've been fussing and praying about this thing since February, depending on the savings in food expenditures giving us a little cushion through the summer and into the fall.
What this means, however, is that I am canning late at night, and my bravado at how good I am at doing that came to a crashing halt Saturday night with the first disaster and melt-down of the year.
It started when Mr. FC&G and I were taking turns in the kitchen. The dishwasher was running, dishes were piling up, and I'm trying to rinse vegetables and fill a canner.
Of course, the canner, which I had balanced on the side of the sink, tipped over, hitting the colander of veggies and dumping them into the sink. I rescued them, rinsed them off, got the canner going, cooked the veggies (extra, just in case of any bacteria from the sink), and filled the jar.
And then the jar wouldn't stand up in the canner. And then I couldn't pick it up with the jar lifter. And then I started to scream bloody murder. Mr. FC&G, who has been known to observe and participate in a few meltdowns in the factories he works in, calmly asked, "do you need help?"
If I didn't know that he doesn't relish witnessing me have a full scale, blood vessel popping meltdown, I'd still be cleaning pickles off the far wall. As it was, we got the rack out of the canner, reseated the jar, and processed those $#%& pickles.
They'd better taste like manna from heaven, that's all I have to say.
Monday, July 17, 2017
How Much Does a Garden Grow: June 2017

Yes, I know its July already. I'm finally doing the June tallies, and that just reminds me how full of hope June always is. Just look at those lovely Principe Borghese tomatoes in the photo, days from starting to ripen. Just lovely.
June brought with it three notable garden harvest events:
- The blueberry harvest was almost finished by the end of the month, with ounces of blueberries total. Even with some critter damage, that's over half a gallon just from my three little bushes (plus a small one that isn't producing yet). Grand total of blueberry value through the end of June was $25.46.
- I discovered/developed a radish relish recipe I've already shared with you, allowing me to harvest and use more of my crop than ever before. Through the end of June, I had harvested over 20 ounces of radishes, for a retail value of $3.90.
- The first tomatoes came in! Even though they were only a couple of ounces of Principe Borghese and a single Siletz, both intended as early tomatoes, this is the first time I can remember harvesting tomatoes in June. Let's hear it for starting tomato seeds on Groundhog Day!
Cumulative Totals
Total Ounces of Harvest: 107.5
Total Pounds of Harvest :6.71875
Total Value of Harvest: $35.06
Total Expenditures: (-$287.67)
Total Profit (Loss): (-$252.61)
Monday, July 10, 2017
Is Gardening a Subversive Act?

Well, it's summer once again, and the news is full of human interest stories about people being penalized for growing food on their own property. There's the standard array of home owners' associations mandating that people remove front yard gardens and neighborhoods adopting policies that gardens, along with clothes lines, depress the property values. My favorite this year, which I unfortunately did not save the link to, involved a municipality that declared that the right to grow food was something to be bestowed by the government, and, since the government had not explicitly conferred this right, the area homeowners could not garden.
Gardening, in some places, has become a subversive act. And this is the kind of subversion I can get behind.
Think of it this way. Every time you plant something you can eat, you remove a little of your dependence on corporations that produce and distribute foodstuffs. Every tomato you pick from your garden is a little less reliance on a corporate entity to provide your dinner. It also is a little step toward independence in the form of better health. That tomato, grown your way (organically, if you so desire), brings you the kind of nutrition that might help ward off diseases and disorders, freeing you from reliance on healthcare and pharmaceuticals.
This is not to say that gardening is a fix for "everything that ails ya." Most of us would notice if the food trucks didn't come to our local grocer, and most of us will need to take advantage of medical care, even if we eat nothing but homegrown organic produce and do yoga every day.
But, every bit of your own food you grow is one step toward greater independence and less reliance on the impersonal structures that seem to govern our lives. That's the kind of subversive behavior I encourage.
Monday, June 26, 2017
Radish-Onion Relish

Enter radish-onion relish. This sweet, spicy (but not hot) relish is just crying out for a hot dog or hamburger to sit on, although I've been eating it as a side dish. It is simply one of the best creations I've stumbled upon in a long time.
First, it is based upon this recipe from Hobby Farms, so please click over and give them some love, then come back to see how I altered it for our tastes.
Radish-Onion Relish
5-8 ounces radishes, trimmed and shredded
1 medium onion, diced
canning salt
Syrup:
1/2 cup apple cider vinegar
1/2 cup sugar
1 t. mustard seed
1 t. whole coriander
1/4 t. turmeric
1/4 t. celery seed
Shred radishes and dice onions, and sprinkle liberally with salt. Allow to wilt for one hour, then rinse and drain.
Heat syrup ingredients to boiling, then add vegetables and return to a simmer. Simmer 5 minutes, then pack into hot, sterile half-pint jars. Process in water bath canner for 10 minutes.
Makes two half-pint jars (or one sealed jar and one for immediate eating!)
The Analysis
Fast: Shredding the radishes cuts down on the wilting time, making these pickles something you can put up while you are making dinner.
Cheap: If you are growing your own veggies, you only have to pay for the syrup supplies.
Good: While the original recipe says these are reminiscent of bread and butter pickles, I don't find the flavors at all similar. The radishes and onions give these a sweet, spicy flavor that is unique; definitely include the coriander, as it introduces a very special note.
Thursday, June 15, 2017
How Much Does a Garden Grow: May 2017

First, the expenditures. We are going back to basics around here; well, modern basics, that is. After several years of tilling our soil using a broadfork, we went back to using a mechanical rototiller. It kind of broke my heart, honestly, but apparently our clay soil is just too much for the poor plants to do any good without a good soil churning. We also added several bags of manure and sandy top soil to the garden to lighten things up, and so far, the plants are responding beautifully. However, the tiller rental and soil amendments set us back a bit, as did the purchase of a few plants I didn't grow from seed, so the challenge is on for the garden to really produce.
It really needs to produce, anyway. We depend on the garden to reduce our food bills across the year, and, in the past two years when we really, really could have used that boost, we didn't have it. I'm primed and ready to have a good year this year.
In May, the harvest officially began as well. It's a little hard to brag, since May showed a total harvest of less than a half a pound of blueberries, worth about $2.85, but that was just the kickoff of the season. You wait until June's totals come in!
So, we are entering my favorite month here in the garden. There is nothing that screams "possibility" quite so much as a June garden, and I am very hopeful that this year's garden will live up to its planned purpose as another "income" stream. Fingers crossed, y'all!
Cumulative 2017 Totals:
Total Ounces Harvested: 10.5
Total Pounds Harvested: 0.65625
Total Value of Harvest: $5.15
Expenditures: (-$287.67)
Profit (Loss): (-$282.53)
Monday, June 5, 2017
Of Coffee and Avocados

Back in the day, I was part of a marketing research project for a company that I will not name, but which makes some of the best grocery-store-level ground coffee out there. The project sought to figure out why Generation X was eschewing coffee in favor of pop in the mornings as we became adults.
See, the crux of the problem was the generation ahead of us. After a youth spent going to Woodstock and a young adulthood spent at Studio 54 (or the equivalent, for both), they had settled into corporate jobs, and they needed to make some money. And those who sold coffee were getting pretty worried that the next generation was not adopting the all-American habit of a cup or six every morning.
To make a long story somewhat shorter, the findings of the project were that young adults basically needed their coffee to not taste like coffee. We preferred it to taste like hot chocolate or some other highly-flavored drink, and an entire industry of flavored creamers and "gourmet" coffee shops was born. We settled into needing our coffee every morning just like generations before us had done.
But, as the economy experienced inevitable ups and downs and the mortgage market got tough and we were having trouble getting promotions at work, some of that older generation had a brilliant idea: Perhaps we couldn't buy the houses and cars we wanted and fund our retirement plans like we wanted because we were drinking too many coffee-shop lattes. Just start bringing your own brew to work in a thermos, and you'll be just fine! Put that $3 or so you save every day into your IRA or toward your mortgage, and the American Dream is all yours.
I'm guilty of this too. I give that kind of advice, and I will continue to tell you to make small changes because they allow you to take control of your life in a very tangible way. And I think I have about two coffee shop coffees a year, preferring the savings realized from my own percolator.
But, if you're struggling financially, chances are it isn't because of the coffee.
I say this because of an annoying trend I see in the media castigating Millennials for buying too much avocado toast and saying that they will never move out of their parents' houses because they are buying too many avocados.
Yeah, that's it. We have a generation that we've saddled with student loan debt the size of a mortgage. If they opt to freelance or be small business owners (as many do), they also pay a health insurance premium that is the size of a mortgage. And buying a house (and taking an actual mortgage) is no longer the guaranteed increase in value that it once was. All of these things are political and societal problems that are beyond the scope of this blog.
But I just wanted to say to all the Millennials: Yes, absolutely watch the money you spend on little things. Restaurant meals add up, as do other small expenses. Take control where you can, because you have to handle that mountain of expenses so you can have a shot at a prosperous life. Heck, I'll even tell you to learn to make avocado toast at home so you don't spend the money for someone else to do it.
But don't ever feel guilty for liking a nutritious fruit and taking some pleasure in what you eat. If you are feeling the crunch, it probably isn't due to the avocados.
Monday, May 22, 2017
The Myth of the "Extra" Tomato

So it's happened again. I mentioned the number of tomato plants I put in this year (60, as of last count), and a well-meaning, generous soul has responded by suggesting a charity that I could donate my "extra tomatoes" to.
This isn't the first time I've heard this. Every year, one or two people have a local charity or food bank that they would like me to send my garden produce to. In general, I think it is a lovely idea. I like the idea of helping those in need have access to fresh, organic vegetables instead of packaged crap, and I may very well decide to make a donation of vegetables as I see fit.
The problem I'm having is this idea of the "extra" tomato. I have never, at any point of my life or at any success level of my garden, looked at my tomato crop and said, "I have no use for these." So, I've set out to attempt to prove or disprove the existence of the "extra" tomato in a scientific fashion.
Hypothesis: There is such a thing as an extra tomato in the FC&G universe.
Proof:
There are 52 weeks in the year. Let's say we don't eat tomato products for four of those weeks, which typically accounts for the period during which all we eat is cucumbers while we wait for the tomatoes to ripen.
Let us further assume that ripe tomato season lasts for eight weeks. During that time, the plants need to produce at least six tomatoes per day to feed the two of us; I can eat that many slicers by myself each day, but let's assume that Mr. FC&G and I each have one capresse salad per day made of three sliced tomatoes, basil, and cheese, which is not unusual at all.
Then, let's look at how much canned and dried tomato product we would consume if rationing were not an issue. We would easily drink a quart of tomato juice each day, for a total of seven quarts. Then, we would use a certain amount of chili sauce, salsa, dried tomatoes, crushed tomatoes, and plain tomato sauce in our cooking. For ease of calculation, let's say that we would consume eight quarts of tomato products per week.
8 quarts = 2 gallons per week
2 gallons per each of 40 weeks = 80 gallons of tomato products
Therefore, my tomato plants need to produce 80 canned or dried gallons of tomatoes in addition to the 336 slicers we will be eating fresh.
Lest you think that the bottleneck will occur at the canning end, let me point out that I have a 7 quart large canner and a 7 pint small canner. I can do two batches a day in each of those with no problem; I'm a writer who works from home, and I have no fewer than four laptop computers that can move easily into the kitchen. I can spend August in the kitchen.
Let's assume, again for ease of math, that I can two batches totalling 10 quarts on each of five days during each week in August.
10 quarts x 2 batches x 5 days = 100 quarts, or 25 gallons
So, during the month of August, I have the capacity to can 100 gallons of tomato products if need be.
Now, I have great hopes for my 60 tomato plants, but I don't believe for a second that they are going to produce 80 to 100 gallons of canned tomato product.
Hypothesis disproven.
There is no such thing as an "extra" tomato.
Tuesday, May 9, 2017
How the World's Best Ballroom Dancer Picked My Kitchen Sink

Mr. and Mrs. FC&G
Replace a Sewer Pipe: A Tragedy in Four Acts
Or
How the World’s Best Ballroom Dancer Picked My Kitchen Sink
Act I
It all
started when we thought we’d gotten lazy about the compost.
Like a lot
of DIY sustainability types, we have a compost pile, and that means we have a
compost bucket. Now, one really needs to empty that bucket every day,
especially during high gardening season, but sometimes you get lazy. So, when
we started to smell rotted food in the fall of 2008, we immediately blamed the
compost.
We started
being vigilant about emptying the bucket every day. Then, it was every time we
put a scrap of food in it. Then, it was a thorough washing outside before the
empty bucket dared to come back in the house. By the end, we were pretty much
carrying individual tomato peels and cores out to the compost pile as soon as
they were cut, then sterilizing the compost bucket and sunning it for extra
measure. But the smell continued.
Mr. FC&G
insisted that the smell wasn’t a clogged drain pipe (spoiler: he was right),
but I was unconvinced. So, one day I bought a bottle of Draino and dumped it
down the non-disposal side of the kitchen sink. I was quickly rewarded with the
fresh, chemical smell of Draino wafting through the house every time the AC
kicked on.
“See, I
fixed it!” I crowed! “Now you can just smell how clean that pipe is.”
Mr. FC&G
didn’t so much react as wilt, visibly, on the spot. “Yeah, that’s what I was
afraid of,” he said.
I will
always remember this moment of my life as the last time I was truly innocent
about the horrors of home ownership. “Whatever do you mean, my darling
husband?” I asked. (I may be remembering that moment a bit better than it
actually was.)
“You didn’t
clean the pipe. The sewer pipe from the kitchen sits on top of the ductwork
that returns to the HVAC system. We have a pipe that is leaking, and you just
leaked Draino into the air ducts.”
After a bit
calm discussion (or else I’m intentionally misremembering that part too), two
things became clear: First, if the heat had been on instead of the AC, I could
have sent a stream of Draino into the heater, and, second, our sewer pipe was
located in our slab.
“What do you
mean, ‘in the slab?’ Is there a crawl space?”
“No,” Mr.
FC&G said defeatedly.
“Then how do
you get to it?”
“Exactly how
you think. You jackhammer up the slab.”
The rest of
the day is pretty much a blur. I don’t have any desire to remember anything
else about that day.
Act II
Well, all
was not lost, because first we needed confirmation that the sewer pipe was
indeed broken. For that, we just needed someone with a flexible camera that
could be threaded down a pipe. I had no idea there was such a thing, but there
is. Apparently, it’s kind of like a colonoscopy, except no one offers you
anesthesia and you have to be awake for the entire invasive procedure.
Not that we
would know this first hand, mind you. As it turns out, there was precisely one
plumbing company in town with such a camera, and they would not, for any amount
of money, consent to come to our house to scope our sewer pipe because – are
you ready? – if they stuck their camera designed
to view the inside of pipes down our sewer pipe, it might break. No appeals
to logic, or, indeed, offers to just buy them a whole new camera that they could
throw away if it broke, would change their minds.
So, after
approval by our insurance, we found a company that would handle the whole deal.
With their help, we moved the entire back half of our house into the front
living room. Every cabinet, every picture on the wall, every piece of
furniture, all of it moved into the living room or up into the spare bedroom. Then,
our workers sealed off the living room and various entrances with plastic and
tape, and they prepared to jackhammer up our slab.
At the time,
I was working part-time as an instructor at a local college, and I left that
day thinking that this wasn’t going to be too bad.
I returned
from work and, hand to heart, it looked like someone had been re-enacting The Grapes of Wrath in my house. Dust
clouds hung in the air, swirling and obscuring your vision. And, once I made it
through the dust and into the kitchen, there it was.
There was a
three-foot deep, 15 foot long trench through my house, running from the
kitchen, through the pantry, across the downstairs hallway, and into the guest
bathroom.
To their
credit, the workers had done an impressively neat job of the work, once you
took into account that they were wielding a jackhammer in places a jackhammer
was never intended to go. But, as it turned out, they started at the bathroom
end and excavated the pipe toward the kitchen until they found the break: at
the joint where the sewer pipe met the drain pipe from the sink.
Let me let
you think about that for a minute. Had they started in the kitchen – or, had we
had someone with a flexible camera willing to shove it two feet down our
kitchen drain – we would have known that the break was essentially right within
the slab under the kitchen counter. Sure, there would have been some destruction,
and I probably would have freaked out anyway, but it would have been a problem
that required relatively little in the way of jackhammering and pouring of
concrete. But now the damage had been done, and we had to live with the repair.
Act III
The problem
with not having a sewer pipe hooked up in your kitchen, in addition to a gaping
trench in there, is that you lose the use of your water, your disposal, and,
until they haul it back in from its temporary spot in the dining room, your
stove. This makes eating a little difficult because, while you can still
microwave, cleaning up the dishes requires washing them in a dishpan and then
taking the dirty water outside and throwing it in the yard. Since it was now
December, this was no one’s favorite job. We spent part of the subsequent May
rescuing flatware from the yard before we started mowing that year.
Our workers
proceeded with, well, absolutely no speed at all. Part of this was because it
was now Christmas. I had to call them and ask nicely if they would hook up my
stove so that I could make us something more than reservations over the
holiday.
Part of it
was because my tile shop was mad at me. I wanted to replace the vinyl, Formica,
and nasty carpet that were originally in the kitchen, on the island countertop,
and in the hallway, but I wouldn’t opt for any of the expensive choices and
complex layouts that would make this a good before-and-after story for their
design portfolios. So, since I didn’t want granite and mosaic tiles laid on the
diagonal, they were going to make me wait.
In the
meantime, Mr. FC&G started having to go out of town for work, and I was
left home to manage this. I was only going to be out of class for a couple more
weeks of Christmas break, and I pushed to get the big parts of the job done
while I was home, but of course the project dragged into the beginning of the
semester.
“Oh, ma’am,
we’re bonded! Just leave the house unlocked and we’ll let ourselves in!”
Like hell. Pardon
my French.
So, I spent
the next two months giving the workers set hours that they could be in the
house and shooing them out when I had to leave. This made for some interesting
schedules. For one thing, it necessarily made me the first stop on their route
each day, so I was getting up at about 5:30 to let workers in the house so they
could do a little bit of work and leave by lunch time.
I tried to
disguise the fact that I was home alone without my husband, but I was running
out of places he could possibly be at 7:00 every morning. At a certain point, I
resigned myself to the fact that my life had turned into a situation in which
every day I waited for a panel van to show up in my driveway, and I would let
two or three strangers into my house to do heaven knows what while I tried to
write. One day, I went downstairs to get something and found my tile guy
rummaging through my cabinets looking for a coffee mug. When he grabbed one of
my good ones (mostly I only have printed coffee mugs that people give me as
speaker gifts; no one ever thinks to give the guest speaker a bag of coffee
beans), I offered to make a pot of coffee.
“No need,”
he said. It turned out that he just wanted to use my good mug to measure the
water so that he could mix a batch of mortar. I just sighed and went back
upstairs.
Act IV
As I
mentioned, Mr. FC&G was doing some travelling for business and was on a per
diem (read: paid restaurant meals), but I was home alone. And, since my kitchen
facilities were limited for most of this endeavor, I had pretty much stopped
eating. There were a good three months that I subsisted on granola bars,
cashews, and cookies – anything that wouldn’t require me to do dishes and throw
flatware into the yard.
So, when May
arrived, the project was nearly done, and I was literally on my last nerve. I
was having panic attacks and was basically shaking all the time. And that was
when a man I’ll call BK came to town.
BK is the
world’s best ballroom dancer, or at least he was. A professional ballroom
dancer and body builder, BK has won championships in every ballroom discipline
available when he was competing. BK doesn’t walk across the floor; he floats
while the angels sing and small birds come and light on his shoulders. And he
is an absolutely ruthless ballroom coach, but he is not one that you dare miss
if you have the slightest opportunity to take a lesson from him
When our project
was nearly complete, BK was in town, and we booked lessons knowing full well we
didn’t have the time or the mental stability for the usual dressing-down one
gets from him. But go to our lessons we did.
BK, who had
relentlessly critiqued us and our sub-par cha-cha the previous visit to town,
apparently figured out that we were not at our best, and he asked us what was
up. We told him a highly abbreviated version of this story, ending with, “and
that’s why, once we finish up here tonight, we still have to go to Lowe’s and
pick out a kitchen sink.”
He leveled
his gaze at us and said, “stainless?”
I agreed and
said that I had my eye on one of those three-basin sinks with the vegetable
sink in the middle, but BK said no.
“Nope. What
you want is a single basin sink. The whole thing, one basin. You won’t ever use
the others, but if you get a single large basin, you can defrost a turkey or
wash your puppy.”
We left the
dance studio that night and drove to Lowe’s and said, “BK wants us to get a
single basin stainless steel kitchen sink” and handed the guy the measurements.
And that’s what we got.
I’ve never
yet defrosted a turkey in that thing, and I don’t have a puppy. I don’t care. At
least I know the world’s best ballroom dancer picked my kitchen sink.
Friday, April 28, 2017
More of DIY Weedkillers

As I mentioned, loyal reader L. has gone the extra mile to experiment with a gallon of vinegar and a tablespoon of Dawn dishwashing liquid. She shared her results with me and gave me permission to share them with you.
In the top two photos, you can see how beautifully this solution worked on both driveway seams and on mulch around posts. I might mix some of this up just to do a strategic kill of the grass around the stop sign in our yard, because I'm getting mightily tired of weed whacking around it!
The bottom is your cautionary tale. The solution will kill grass, so if that is a concern for you, you will want to exercise caution. But, if you look closely in the bottom photo, you'll see some lovely little violets popping their heads up, which I always think is so pretty in a yard!

Not only do the bees love the spring flowers, but encouraging the low groundcover reduces the amount of grass we have and therefore the amount of mowing we have to do. As I mentioned last week, we have whole patches that we no longer have to mow regularly just because we've encouraged the grass to depart in favor of something prettier. It isn't for everyone, and if you absolutely love a yard that looks like a golf course, you should go for it. To each his own.
In any event, thank you to L. for sharing her findings with us!

Thursday, April 20, 2017
Weed Killers without Poison

Sigh. As you know, I'm no big fan of herbicides. And it's none of my business what the neighbors do on their own properties, as they march up and down their driveways and side flower beds with the big spray dispenser of Roundup, gleefully dumping five gallons of glyphosate preparation on perfectly innocent plants that happened to grow in the wrong place. (And spraying their own feet and legs in the process, so good luck with that, guys.)
It's none of my business, but I get cranky when I think of herbicides in the water table, to say nothing of potential impact on my garden. But all I can do is treat my property without the herbicides that make me uncomfortable. So, here's my top five ideas for controlling weeds without any chemical nasties:
Reframe your perspective: Those dandelions and purple deadnettles? The bees love them, and they are the first food for our pollinators in the spring. Give the bees a break and let your weeds grow a bit. We have some of the friendliest bees in our garden every year, and I think it's because they know they can always come eat at our house.
Mow: I know the good people who sell chemical lawn products don't want you to know this, but there's very little visual difference between a yard full of grass and one that has clover and other "weeds," especially if you mow it short. Once you think you've attracted the bees and are ready to get rid of some lawn weeds, just lower the blades on your mower. We have whole patches of our yard that basically never need mowed any more, because the low-slung clover has taken over the grass.
Boiling Water: So, having weeds in the yard is one thing, but having them in the cracks of your sidewalk or driveway is another. I get it. Every year, I take the boiling water from the canner outside and dump it on patches of offending weeds as my last step in putting up my produce. The weeds stay gone for a long time, and there is no worry about runoff. Just don't accidentally dump on your toes!
Salt Water: Ever heard of a "salted earth" strategy? That refers to the fact that salt will keep your land from growing anything. I occasionally take the leftover brine from making pickles out to places with really stubborn weed growth. The hot vinegar and salt will pretty much kill anything; just make sure it doesn't run off into your garden!
Vinegar and Dawn: Thank you to my loyal reader L. (I wasn't sure if she wanted her name used) who experimented with a gallon of vinegar mixed with a tablespoon of Dawn dishwashing liquid. According to her report and the pictures she sent, it does a bang-up job on the weeds, which are dead in a couple of days. She also shared how it will kill grass, so exercise caution. But the best news is that this solution costs about $3, compared to ten times that amount for Roundup! That's a FC&G win!
Friday, April 7, 2017
Salted Caramel Applesauce Cookies

That, and they just taste better.
In any event, I recently discovered salted caramel chips, and these things are a wonder. Riffing a bit on the traditional Tollhouse Cookie recipe, I devised a salted caramel applesauce cookie that is soft and sweet with just that hint of salt to balance things out.
Salted Caramel Applesauce cookies
1 t. baking soda
1 t. salt
1 1/2 cup organic raw or turbinado sugar
2 sticks organic butter (either salted or unsalted will work)
1 t. organic vanilla extract
1/2 cup applesauce (I used homemade)
2 1/2 cup organic flour
2 cups salted caramel chips
Preheat oven to 375 degrees.
Mix first six ingredients together until smooth. Mix in flour and chips to make a reasonably stiff batter. Drop by rounded tablespoons onto ungreased baking sheets, and bake for 10-12 minutes. (My oven requires about 12 minutes; you should see just the barest hint of brown on the tips when they are done.)
Makes 3-4 dozen.
Correction: there is no butter in this recipe, but there are two eggs. So sorry!
Tuesday, March 28, 2017
Ferrying the Tomatoes

In between, April is the month of Ferrying the Tomatoes.
That first month, the tomatoes are so easily contained. They sit in their little starter pots in the nursery incubator that I've hauled into the dining room for its seasonal use in the the sunny window. Grow lights and a heat mat provide a cozy, sunny environment, and all is right with the world.
Inevitably, the repotting starts, and this year I have been more diligent than ever before in not letting my little darlings get at all root bound. This means that I'm currently in the process of repotting an estimated 100 tomatoes into four-inch pots and hoping they can get some decent growth before planting time.
But 100 tomatoes in four-inch pots aren't going to fit in the nursery incubator; they won't even fit in the dining room. So, every day, I ferry tomatoes from place to place, hoping to get them each a chance at the ideal amount of light, warmth, and natural exposure to begin hardening off.
We have a pop-up greenhouse that will ultimately hold all of the tomatoes, but right now, it is only warm enough during the day. So, any tomatoes in the greenhouse get carried back inside at night.
I have the cozy incubator, and it has a nice shelf underneath, but it will only hold a few tomatoes under its grow lights.
There's a sunny window available, but the shelf under it will only hold a few tomatoes as well, and it doesn't get quite enough sun during the day to make it a long-term solution.
The sunroom is also a likely candidate, because it has both natural sunlight and a grow light, but the shelving situation doesn't allow enough room for all the tomatoes.
So, even as you read this, you can imagine me taking tomatoes from place to place, rotating them into different environments, inspecting them, fertilizing them, and hoping that this year I've got them off to a good start.
I wouldn't have it any other way.
Thursday, March 16, 2017
How Much Does a Garden Grow: January and February 2017

Overall, I harvested a laughable three ounces of produce over the first two months of the year, with most of that coming from my kale plants that I seeded last February (2016) and kept growing for an entire year. An infestation of aphids made me pull the plants, but I think they gave their all. I also harvested a single small pepper and experimented with growing some microgreens, with little success.
Expenditures were confined to seeds so far, so we are starting off economically. My tomatoes are on their first repotting, enjoying their larger homes after getting started in their baby pots. The photo at the right was taken a week ago; today, I looked in to discover that I had some tomatoes that were already four inches high. At this rate, I may finally have some really respectable tomato plants by the time planting season comes along. In fact, I plan to put up the outside greenhouse at the end of the month, in hopes of weather warm enough that I can move larger pots of tomatoes outside into their protected pop-up greenhouse to harden off and keep growing. In the meantime, one of my daily jobs is to rotate the tomato plants to make sure they all get a shot under the grow light, and to keep topping up their soil, watering them, and fertilizing them regularly.
Cumulative Totals to Date
Total Ounces Harvested: 3.0
Total Pounds Harvested: 0.1875
Total Value of Harvest: $2.30
Total Expenditures: $26.70
Total Profit (Loss): ($24.41)
Friday, March 10, 2017
On Using the Good China

It grieves me, on some level, to think that I may be part of the last generation of brides to even want good china. The day after we got engaged, Mr. FC&G and I went to the department store and registered for our china, silverware, and other items. I remember how excited I was to finally - finally - get this lovely, delicate stuff and to have it displayed in my china cabinet. (Buying the china cabinet, which I had done years earlier, should have been my first clue that I was on the end of a demographic trend, because it took trips to many, many stores to find something that would function as such. No one offered a "china cabinet" per se.) Receiving the beautiful boxes of china as wedding gifts thrilled me, and, to this day, I stop and look at my china every time I walk into the dining room.
It made me sad when, a decade or so ago, I started reading reports of how people were no longer buying good china. They were afraid of breakage, they didn't want to wash it by hand, and they wanted the money to spend on something else. More power to them, I suppose. However, I also became aware, through personal experience, that no one knows how to act around good china any more.
I have let myself become shamed out of using the good stuff, because it invariably sparks some sort of contentious moment in which I either be a good hostess and let my guests have what they want, or I stand my ground. Since I am of the school of thought that holds that a good hostess, upon seeing her guest drink from the finger bowl, resolutely takes a swig out of her own, I usually wind up capitulating.
I have had guests hand plates back to me, asking for something not so precious and saying that they can eat off anything - and that's just when I'm using my second-best, "everyday" china that was my "good stuff" from when I was single. I have nearly bitten my tongue off to refrain from saying that, if they can eat off anything, surely they can figure out how to eat off a plate that I didn't buy in a boxed set in grad school.
I have had visitors charge into my kitchen and plunge their hands into my everyday silverware drawer, unwilling to wait until I retrieve a matched set for their use. "Oh, don't go to any bother; I can get it," they say. But maybe I wanted to offer something nice for their use, and it's not like I don't have a couple of complete, matched sets of dessert forks that I can use to serve people.
I have even had people hand cloth napkins back to me and ask for a paper napkin. On that one, I have no choice but to protest, because I don't own any paper napkins, save for maybe a pack of birthday-themed ones shoved into the back of the pantry. I haven't otherwise purchased paper napkins in over a decade. I've learned to hide the paper towel roll if I have people over for a summer cookout, because they will invariably refuse to pick up a cloth napkin from the buffet and tell me that I shouldn't have to wash the cloth napkins. Really, folks, it's no trouble; I put them in the washer and hang them outside to dry. I'm not exactly washing them on a wash board and then starching and ironing them.
In short, I have let myself succumb to peer pressure to not enjoy and share my finest possessions, even though doing so brings me great joy. I want people to know that they mean a great deal to me, and that they are worth me creating an elegant experience. Am I going to serve picnic food outside on the good china? Probably not. But I derive a lot of pleasure from using the china, the good silverware, and the pretty cloth napkins to enjoy a meal with friends or family. To me, it is my reward for serving my guests.
So, no more of this. From here forward, the good china is coming out of hiding once in a while, if only just for Mr. FC&G and I. We have long planned that, when we retire, we will get rid of the kitchen table and take only the good dining room table to our new home, and that we will likely use the china as well. I think that should start today. We deserve the joy of using the nicer things, and, if you are invited to our house, I hope you will do so too.
Tuesday, February 28, 2017
Reusable Swiffer (TM) Mop Covers

For a long time, I've been intending to crochet some reusable covers for my Swiffer mop,. And, since the weekend past was boring and cold and yucky, I had time to do just that.
I love my Swiffer mop. There's just something about that ball joint that lets you mop in corners and around furniture legs that is so pleasant-feeling, you really want to use it more often. But the disposable dry and wet (especially) cloths will break the bank!
For a long time, I've attached cut up flannel and fleece rags to the mop head, and that solution works pretty well. But these reusable covers are another level entirely.
I made them with pockets on the ends that hold the cover snugly on your mop head, so they don't slip off like the disposable sheets do. Plus, I made the cover ridged, so that it picks up dust and dirt more easily. Afterward, you just slip the cover off and wash it with your towels or jeans, and it is ready to use again. If making or having a couple of these saves you from buying a single box of Swiffer wet cloths, you will have saved money.
If you like to crochet, you can design a pattern that works well for your particular mop and needs and work through these pretty quickly. (I might write up the pattern when I used when I get time.) I recommend using cotton yarn, as it is more absorbent and easier to wash.
I made up a few for myself, and then, with the encouragement of a friend, I have listed a few in my Carrot Creations shop. The link is below. In their initial day, they seem to be selling pretty briskly, so check back if you don't see what you want. I have lots of leftover yarn and have priced these to be FC&G!
https://www.etsy.com/shop/CarrotCreations?ref=hdr_shop_menu§ion_id=21202397
The Analysis
Fast: Quick to make, quick to use.
Cheap: If you buy these from me and spend $10 (plus S&H) on two, you will break even once you forego buying one box of wet mop covers. If you make your own, you will be in the black even more quickly.
Good: I adore a project that helps me keep my house clean and saves me money while keeping junk out of the landfill!
Subscribe to:
Posts
(
Atom
)